X-ray inspection system suitable for BGAs or THT-components
Traditional X-ray technologies are limited in inspecting components like BGAs, LGAs or THT-components. Omron’s automatic X-ray inspection system VT-X750 incorporates ‘Computed Tomography’ (CT), specifically to provide high-precision, X-ray imaging to perform precise and reliable analysis of these hidden soldered areas.
“The VT-X750 can inspect accurately and reliably, soldered defects such as Head in Pillow and voids within BGA and LGA devices,” explained Kevin Youngs, Key Account Manager Europe at Omron Automated Inspection Business Europe. The new inspection system also measures the percentage solder, including voids in QFN’s, and Barrel Fill in through-hole devices.
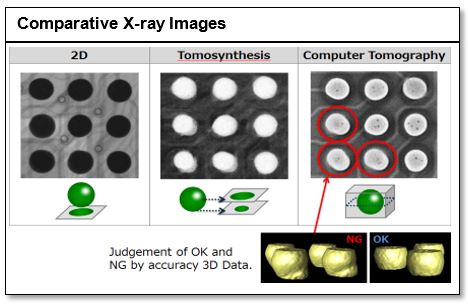
Traditional AXI systems incorporate 2D or 2.5D X-ray tomography. But these technologies provide limited capability causing high false calls and are insufficient to find core defects such as Head in Pillow and in many cases, voids. The limitation of these systems is the capability to inspect PCB’s with double sided components. 3D-AXI overcomes these deficiencies of traditional 2D or 2.5D system. However, in today’s AXI systems, there are two basic forms of 3D X-ray: Tomosynthesis and Computed Tomography.
The VT-X750 inspections are performed very quickly at speeds less than four msec. per field-of-view (FOV). Omron strongly believe combining VT-X750 new ultra-fast process times and data capturing technology, VT-X750 is the first 3D-CT AXI system that can be utilised into the SMT production Line.
“We see this as a great benefit targeted to increase customer manufacturing quality and reduce manufacturing costs,” said Youngs. In comparison to Tomosynthesis, VT-X750 utilises CT reconstruction software and combines multi-slice data with laser displacement technology that gauges the PCB surface for each solder-joint, for example each solder ball of BGA, compensating for any warpage and allowing the system to perform cross-sectional analysis at the proper slice-level locations.
Selectable inspection of 6, 8, 10, 15, 20, 25 or 30µ combined with selectable numbers out of 512 X-ray projections up to 512, taken from different angles to produce cross sectional tomographic images of specific areas of target area, allow for user-driven variation between higher inspection speeds for production environments, and ultra-high-quality 3D image acquisition for research of defect analysis.
“The machine offers benefits for a big group of customers, from automotive suppliers, with high running production lines to midsize companies who need an X-ray also for smaller batches,” said Youngs.
Omron incorporates CT as VT-X750 principle inspection criterion. “The key factor was to develop 3D X-ray technology that addresses the limitations of other 2.5D and other 3D X-ray technologies, thus providing the highest quality solder joint inspection for key industries such as automotive, aerospace, infrastructure, communication and medical,” explained Youngs.

